Ready to streamline your complex Zabbix operations?
I’ve distilled the most valuable insights from this blog into one essential guide. Take full control of your environment with the Zabbix 7 Enterprise Optimization Handbook [Mastering Hybrid Infrastructure Monitoring with a Kubernetes First Approach].
👉 Get your PDF copy here: https://jikimy.gumroad.com/l/zabbixmaster
Overview
Zabbix’s built-in notification system alone often isn’t enough for real-time monitoring.
By connecting Slack via a Webhook, you can receive immediate alerts for both incidents and recoveries.
This post provides a practical step-by-step guide for integrating Zabbix 7.4 with Slack Webhooks.
Follow the instructions below to implement a stable and production-ready Slack alert integration.
1. Pre-check
1.1 Allow Outbound Connection
Ensure the Zabbix server can reach hooks.slack.com:443.
If you are behind a firewall or proxy, add an exception for this domain and port.
1.2 Create a Slack Channel and Webhook
- Create a dedicated Slack channel for monitoring.
- Go to Channel Settings → Add App → Incoming Webhooks → Generate a Webhook URL.
1.3 Validate the Webhook
Test the Webhook directly from the Zabbix server:
Replace webhook URL in the command below with the Webhook address generated from Slack, then run it..

# curl -X POST \
  -H 'Content-type: application/json' \
  --data '{"text":"Zabbix → Slack connection test"}' \ 'webhook URL'   -> replace with the actual webhook url
If the message appears in your Slack channel, the Webhook is valid.
2. Add a Global Macro for Zabbix URL
Navigate to Administration → Macros → Add Macro
| Macro | Value |
|---|---|
{$ZABBIX.URL} | https://<your-zabbix-domain> |
| Example | http://zbx.example.com/zabbix |
3. Configure the Slack Media Type
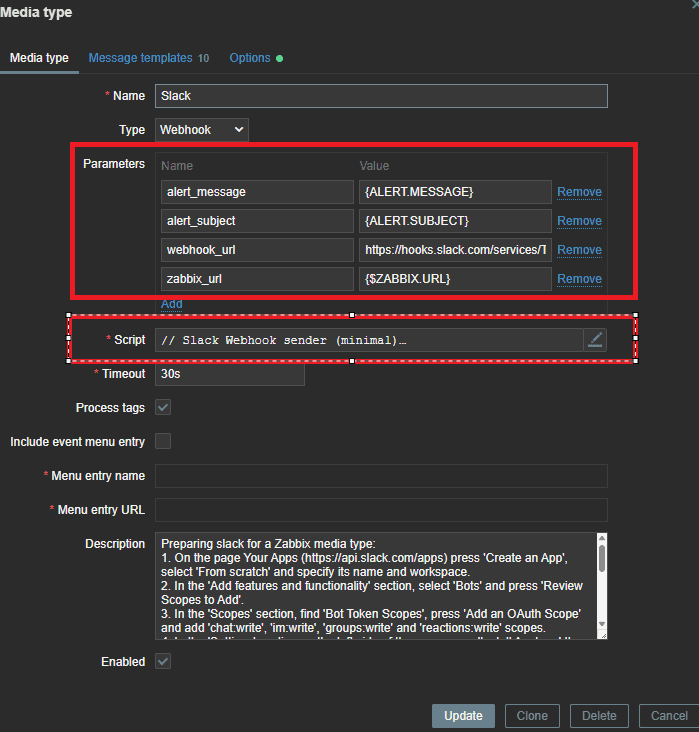
3.1 Add the Webhook Parameter
Go to Alerts → Media Types → Slack → Enable and Edit.
Add a new parameter named webhook_url.
3.2 Remove Unused Parameters
Keep only the following parameters and delete all others:
| Name | Value |
|---|---|
| alert_message | {ALERT.MESSAGE} |
| alert_subject | {ALERT.SUBJECT} |
| webhook_url | (Slack Webhook URL) |
| zabbix_url | {$ZABBIX.URL} |
3.3 Replace the Script
Replace the script content with the minimal Webhook sender below, then click Update.
// Slack Webhook sender (minimal)
try {
  var p = JSON.parse(value);
  var payload = {
    "text": "*" + (p.alert_subject || "Zabbix") + "*\n" + (p.alert_message || "")
  };
  var req = new HttpRequest();
  req.addHeader('Content-Type', 'application/json');
  var resp = req.post(p.webhook_url, JSON.stringify(payload));
  if (req.getStatus() != 200) {
    throw 'Slack webhook response: ' + req.getStatus() + ' ' + resp;
  }
  return 'Message sent successfully to Slack.';
} catch (e) {
  throw 'Failed to send Slack message: ' + e;
}
4. Assign Slack Media to a User
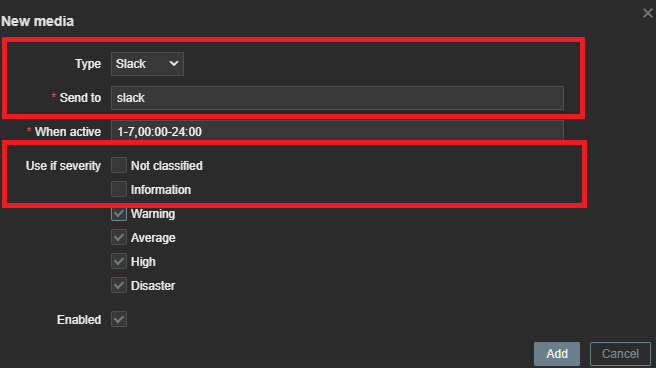
Go to Users → Admin → Media
- Click Add under “Media”.
- Type: Slack
- Send to: Enter any dummy value (e.g.,
slack). - Keep Default checked.
- Set the severity to Warning or higher.
- Click Add → Update.
5. Create a Notification Action
5.1 Edit the Trigger Action
Path: Alerts → Actions → Trigger Actions → Report problems to Zabbix administrators
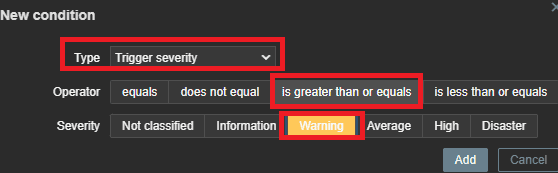
5.2 Add a Condition
- Type: Trigger severity
- Operator: ≥ (is greater thanl or equals)
- Severity: Warning
- Check Enabled and click Add.
5.3 Configure the Operations
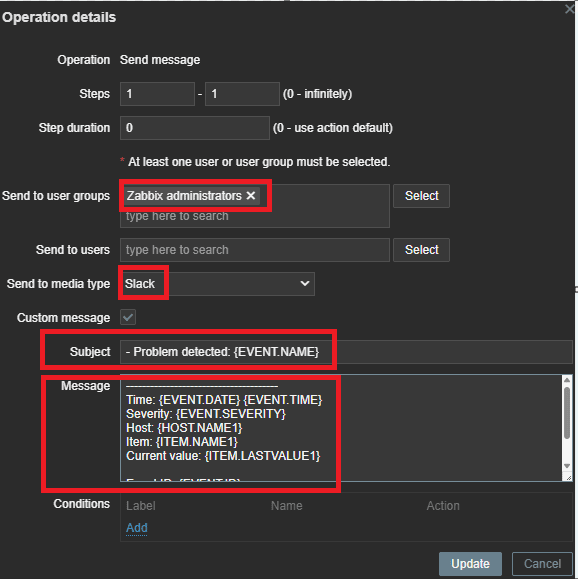
- Edit Operation steps 1
- Send to User group: Zabbix administrators
- Send to Media type: Slack
- Enable Custom message
- Enter the following:
Problem alert message
- Problem detected: {EVENT.NAME}

--------------------------------------
Time: {EVENT.DATE} {EVENT.TIME}
Severity: {EVENT.SEVERITY}
Host: {HOST.NAME1}
Item: {ITEM.NAME1}
Current value: {ITEM.LASTVALUE1}

Event ID: {EVENT.ID}
Link: {$ZABBIX.URL}/tr_events.php?eventid={EVENT.ID}
5.4 Add a Recovery operations
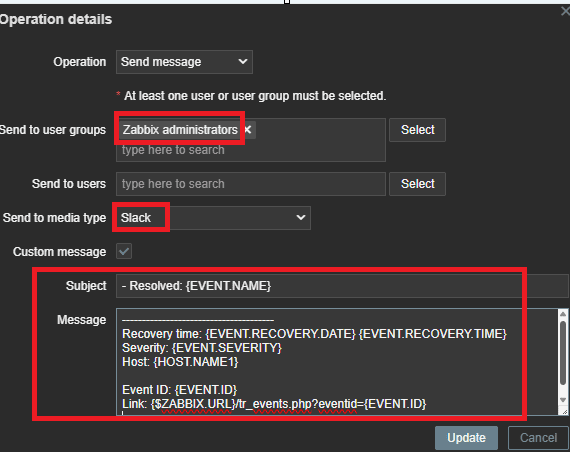
- Send User group: Zabbix administrators
- Send to Media type: Slack
- Enable Custom message
- Enter the following:
Recovery alert message
- Resolved: {EVENT.NAME}

--------------------------------------
Recovery time: {EVENT.RECOVERY.DATE} {EVENT.RECOVERY.TIME}
Severity: {EVENT.SEVERITY}
Host: {HOST.NAME1}

Event ID: {EVENT.ID}
Link: {$ZABBIX.URL}/tr_events.php?eventid={EVENT.ID}
6. Save and Apply All Changes
After completing the Action configuration, click Update.
Trigger a test event to verify that Slack messages are received correctly.
✅ Final Checklist
| Item | Status |
|---|---|
Outbound access to hooks.slack.com:443 | ✅ |
| Webhook test successful | ✅ |
Global macro {$ZABBIX.URL} added | ✅ |
| Slack media type active & script replaced | ✅ |
| Slack media assigned to user | ✅ |
| Problem & recovery actions working | ✅ |
Conclusion
Once configured, Zabbix will automatically send event alerts to the designated Slack channel.
This setup requires no external modules—only the native Webhook and built-in Zabbix features.
It’s simple, reliable, and safe to use even in production environments.
🛠 마지막 수정일: 2025.12.12
ⓒ 2025 엉뚱한 녀석의 블로그 [quirky guy's Blog]. All rights reserved. Unauthorized copying or redistribution of the text and images is prohibited. When sharing, please include the original source link.
💡 도움이 필요하신가요?
Zabbix, Kubernetes, 그리고 다양한 오픈소스 인프라 환경에 대한 구축, 운영, 최적화, 장애 분석,
광고 및 협업 제안이 필요하다면 언제든 편하게 연락 주세요.
📧 Contact: jikimy75@gmail.com
💼 Service: 구축 대행 | 성능 튜닝 | 장애 분석 컨설팅
📖 E-BooK [PDF] 전자책 (Gumroad):
Zabbix 엔터프라이즈 최적화 핸드북
블로그에서 다룬 Zabbix 관련 글들을 기반으로 실무 중심의 지침서로 재구성했습니다.
운영 환경에서 바로 적용할 수 있는 최적화·트러블슈팅 노하우까지 모두 포함되어 있습니다.
💡 Need Professional Support?
If you need deployment, optimization, or troubleshooting support for Zabbix, Kubernetes,
or any other open-source infrastructure in your production environment, or if you are interested in
sponsorships, ads, or technical collaboration, feel free to contact me anytime.
📧 Email: jikimy75@gmail.com
💼 Services: Deployment Support | Performance Tuning | Incident Analysis Consulting
📖 PDF eBook (Gumroad):
Zabbix Enterprise Optimization Handbook
A single, production-ready PDF that compiles my in-depth Zabbix and Kubernetes monitoring guides.
답글 남기기
댓글을 달기 위해서는 로그인해야합니다.