Creating AWS Resources with Terraform
Building a Minimum-Cost Practice Infrastructure with Terraform
⚠️ Pre-Notice
This configuration is for lab and practice purposes only.
In production, a single NAT Instance–based SPOF architecture is not recommended.
For operational environments, a GWLB + multi-sensor (multi-AZ / multi-instance) architecture is recommended.
While AWS Network Firewall offers ‘ease of management,’ it comes with a heavy price tag: high traffic costs and functional limitations.
If you possess the skills to truly master your infrastructure, building a custom solution with GWLB and Suricata is the superior choice—drastically reducing costs while granting you complete technical control.
Will you pay the ‘tax’ for convenience, or seize ‘freedom’ through technology? The choice is entirely yours.
If you are not familiar with Terraform:
Create resources manually using the AWS Console, skip this part (Part 1), and proceed directly to the next guide covering Suricata / ELK installation and signature testing.
Instance Specification Notes
In this lab, both the Suricata NAT Instance and the target server are configured as t3.medium.
This choice simplifies initial setup and performance validation.
However, from a cost perspective, keeping both instances at the same specification is not required.
- Suricata NAT Instance
Because it handles packet processing, NFQUEUE, and ELK (Logstash / Elasticsearch),
a minimum of t3.medium or higher is recommended. - Web Server Target Instance
Since it is used only for traffic generation and attack testing,t3.microort3.smallis sufficient.
If you choose to downgrade, you must modify the instance type directly in Terraform code.
(In this lab, the same instance type is maintained for simplicity.)
1. Objective
- Build Suricata + ELK on a NAT Instance
(OpenSearch is not used due to cost considerations) - Create a Target Server in a Private Subnet and enforce all traffic routing through the NAT Instance
- Attach an EIP to fix the NAT’s public IP
- Enable one-command creation / one-command destruction using Terraform
📌 Scope of Terraform Code (Important)
The Terraform code provided in this series includes only the core components required to explain Suricata Inline IPS configuration.
In real operational environments, the following resources are often already managed separately with different structures and code:
- VPC
- Subnets (Public / Private)
- Route Tables
- Internet Gateway
- Existing EC2 instances and Security Groups
- Other network modules
Because every environment differs, publishing the entire Terraform code from my own production environment would cause confusion.
Instead, the following principles are applied.
Terraform Guide Principles for This Series
- Only Suricata-related resources are explicitly defined
- Existing infrastructure is assumed to be:
- Referenced via
dataresources, or - Passed as variables from a parent module
- Referenced via
- Readers must adapt the examples to their own Terraform structures
In other words, the code in this series is:
Not for copy-and-paste use
But a reference implementation for understanding structure and adaptation
2. Architecture

There are two core points:
- NAT Instance must have
source/dest checkdisabled - Private Subnet routing must force
0.0.0.0/0 → NAT Instance ENI
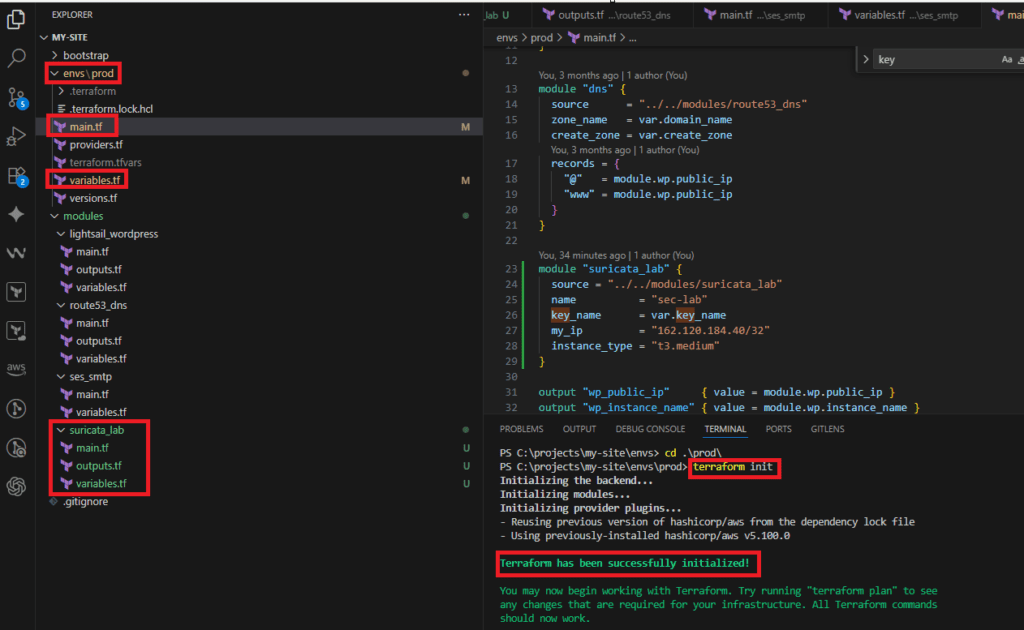
3. Directory Structure
As shown in the image, the module is separated into three files.
my-site/
├─ envs/
│  └─ prod/
│     ├─ main.tf
│     ├─ variables.tf
│     └─ terraform.tfvars
└─ modules/
   └─ suricata_lab/
      ├─ main.tf
      ├─ variables.tf
      └─ outputs.tf
- All resources are placed in
modules/suricata_lab/main.tf variables.tfandoutputs.tfcontain only minimal definitionsenvs/prodhandles module calls and variable declarations only
4. Additions Required in envs/prod
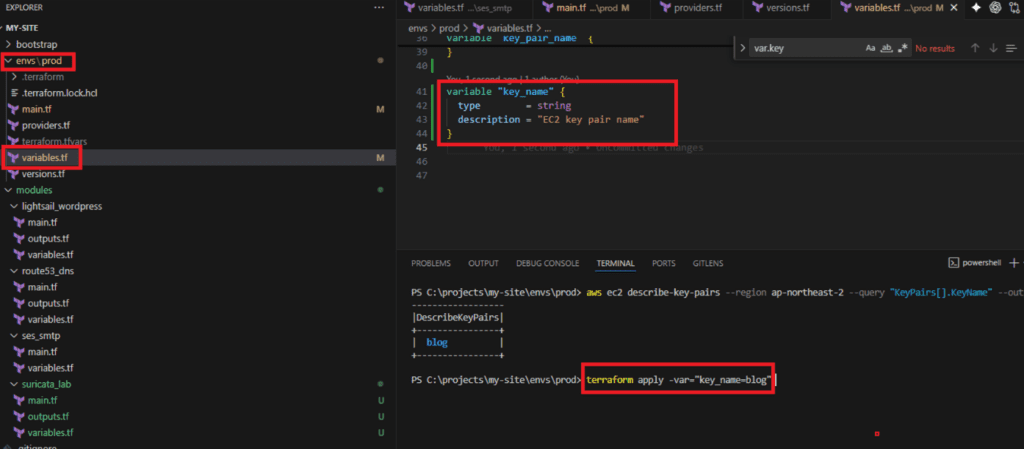
4.1 envs/prod/variables.tf
variable "key_name" {
  type        = string
  description = "EC2 key pair name"
}
4.2 envs/prod/main.tf
(Existing modules can remain; only this module needs to be added.)
module "suricata_lab" {
  source        = "../../modules/suricata_lab"
  name          = "sec-lab"
  key_name      = var.key_name
  my_ip         = "162.120.XXX.XXX/32"  # apply your actual public IP
  instance_type = "t3.medium"
}
5. modules/suricata_lab Code
✅ modules/suricata_lab/main.tf
############################################################
# modules/suricata_lab/main.tf
# - Ubuntu 24.04
# - NAT Instance (Suricata IPS + ELK) in Public Subnet
# - Target EC2 in Private Subnet
# - Private RT: 0.0.0.0/0 -> NAT Instance
# - NAT Instance: source_dest_check = false
############################################################


############################
# VPC / Subnet / IGW
############################
resource "aws_vpc" "lab" {
  cidr_block           = "10.20.0.0/16"
  enable_dns_support   = true
  enable_dns_hostnames = true

  tags = {
    Name = "${var.name}-vpc"
  }
}

resource "aws_internet_gateway" "lab" {
  vpc_id = aws_vpc.lab.id

  tags = {
    Name = "${var.name}-igw"
  }
}

resource "aws_subnet" "public" {
  vpc_id                  = aws_vpc.lab.id
  cidr_block              = "10.20.0.0/24"
  map_public_ip_on_launch = true

  tags = {
    Name = "${var.name}-public"
  }
}

resource "aws_subnet" "private" {
  vpc_id     = aws_vpc.lab.id
  cidr_block = "10.20.1.0/24"

  tags = {
    Name = "${var.name}-private"
  }
}

############################
# Route Table - Public
############################
resource "aws_route_table" "public" {
  vpc_id = aws_vpc.lab.id

  route {
    cidr_block = "0.0.0.0/0"
    gateway_id = aws_internet_gateway.lab.id
  }

  tags = {
    Name = "${var.name}-rt-public"
  }
}

resource "aws_route_table_association" "public" {
  subnet_id      = aws_subnet.public.id
  route_table_id = aws_route_table.public.id
}


############################
# Security Group - NAT/Suricata/ELK
############################
resource "aws_security_group" "nat" {
  name        = "${var.name}-sg-nat"
  description = "NAT Instance (Suricata+ELK) SG"
  vpc_id      = aws_vpc.lab.id

  # SSH (management)
  ingress {
    description = "SSH from my IP"
    from_port   = 22
    to_port     = 22
    protocol    = "tcp"
    cidr_blocks = [var.my_ip]

  }

# HTTP allow (only my ip)
  ingress {
    description = "HTTP from my IP"
    from_port   = 80
    to_port     = 80
    protocol    = "tcp"
    cidr_blocks = [var.my_ip]
  }

  # Kibana
  ingress {
    description = "Kibana from my IP"
    from_port   = 5601
    to_port     = 5601
    protocol    = "tcp"
    cidr_blocks = [var.my_ip]
  }

#private target allow
  ingress {
    description = "All from target ip"
    from_port   = 0
    to_port     = 0
    protocol    = "-1"
    cidr_blocks = ["10.20.1.0/24"]

  }


  # Outbound all
  egress {
    from_port   = 0
    to_port     = 0
    protocol    = "-1"
    cidr_blocks = ["0.0.0.0/0"]
  }

  tags = {
    Name = "${var.name}-sg-nat"
  }
}

############################
# Security Group - Target (Private)
############################
resource "aws_security_group" "target" {
  name        = "${var.name}-sg-target"
  description = "Target EC2 (private) SG"
  vpc_id      = aws_vpc.lab.id

  # SSH (management)
ingress {
  description     = "SSH from NAT Instance only"
  from_port       = 22
  to_port         = 22
  protocol        = "tcp"
  security_groups = [aws_security_group.nat.id]
}


  # HTTP: NAT SG만 허용(optional)
  ingress {
    description     = "HTTP 80 from NAT SG"
    from_port       = 80
    to_port         = 80
    protocol        = "tcp"
    security_groups = [aws_security_group.nat.id]
  }

  # Outbound all
  egress {
    from_port   = 0
    to_port     = 0
    protocol    = "-1"
    cidr_blocks = ["0.0.0.0/0"]
  }

  tags = {
    Name = "${var.name}-sg-target"
  }
}

############################
# EC2 - NAT/Suricata/ELK (Public)
############################
resource "aws_instance" "nat" {
  ami                         = "ami-0a71e3eb8b23101ed"
  instance_type               = var.instance_type
  subnet_id                   = aws_subnet.public.id
  vpc_security_group_ids      = [aws_security_group.nat.id]
  key_name                    = var.key_name
  associate_public_ip_address = true

 root_block_device {
    volume_size           = 20
    volume_type           = "gp3"
    delete_on_termination = true
  }

  # Required: NAT Instance Configuration
  source_dest_check = false

  tags = {
    Name = "${var.name}-nat-suricata-elk"
  }
}

############################
# EC2 - Target (Private)
############################
resource "aws_instance" "target" {
  ami                    = "ami-0a71e3eb8b23101ed"
  instance_type          = var.instance_type
  subnet_id              = aws_subnet.private.id
  vpc_security_group_ids = [aws_security_group.target.id]
  key_name               = var.key_name

  tags = {
    Name = "${var.name}-target"
  }
}

############################
# Route Table - Private
#  - 0.0.0.0/0 -> NAT Instance
############################
resource "aws_route_table" "private" {
  vpc_id = aws_vpc.lab.id

  route {
  cidr_block              = "0.0.0.0/0"
  network_interface_id    = aws_instance.nat.primary_network_interface_id
}


  tags = {
    Name = "${var.name}-rt-private"
  }
}

resource "aws_route_table_association" "private" {
  subnet_id      = aws_subnet.private.id
  route_table_id = aws_route_table.private.id
}

# NAT Instance EIP
resource "aws_eip" "nat" {
  domain = "vpc"

  tags = {
    Name = "${var.name}-eip-nat"
  }
}

#Attaching an EIP to the NAT Instance
resource "aws_eip_association" "nat" {
  allocation_id = aws_eip.nat.id
  instance_id   = aws_instance.nat.id
}
6. modules/suricata_lab/variables.tf
All resources are defined in main.tf.
This file contains variable declarations only.
✅ modules/suricata_lab/variables.tf
variable "name" {
  type        = string
  description = "Lab name prefix"
}

variable "region" {
  type    = string
  default = "ap-northeast-2"
}

variable "key_name" {
  type = string
}

variable "my_ip" {
  type        = string
  description = "162.120.xxx.xxx/32"  # apply your actual public IP
}

variable "instance_type" {
  type    = string
  default = "t3.medium"
}
7. modules/suricata_lab/outputs.tf
Outputs are kept minimal.
They are used only for NAT access and target verification during the lab.
✅ modules/suricata_lab/outputs.tf
output "nat_public_ip" {
  value = aws_eip.nat.public_ip
}

output "target_private_ip" {
  value = aws_instance.target.private_ip
}
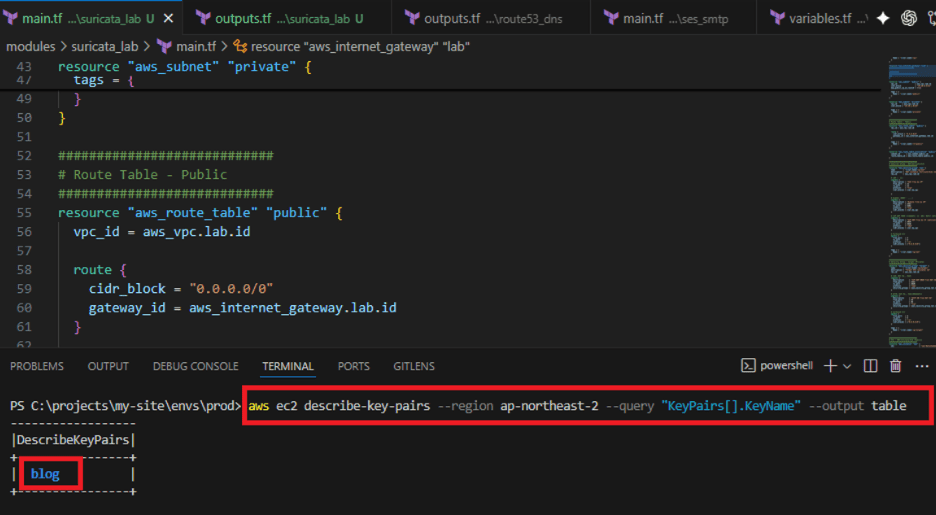
8. Injecting Variables and Running Terraform
Key pairs do not need to be created by Terraform.
Create them in the AWS Console and provide only the name.
Running the Deployment via PowerShell Below is a step-by-step example of executing the commands within a Windows PowerShell environment.
cd C:\projects\my-site\envs\prodPS C:\projects\my-site\envs\prod> terraform initPS C:\projects\my-site\envs\prod> aws ec2 describe-key-pairs --region ap-northeast-2 --query "KeyPairs[].KeyName" --output tablePS C:\projects\my-site\envs\prod>terraform apply -var="key_name=blog"Step-by-Step: Executing Terraform and Infrastructure Provisioning
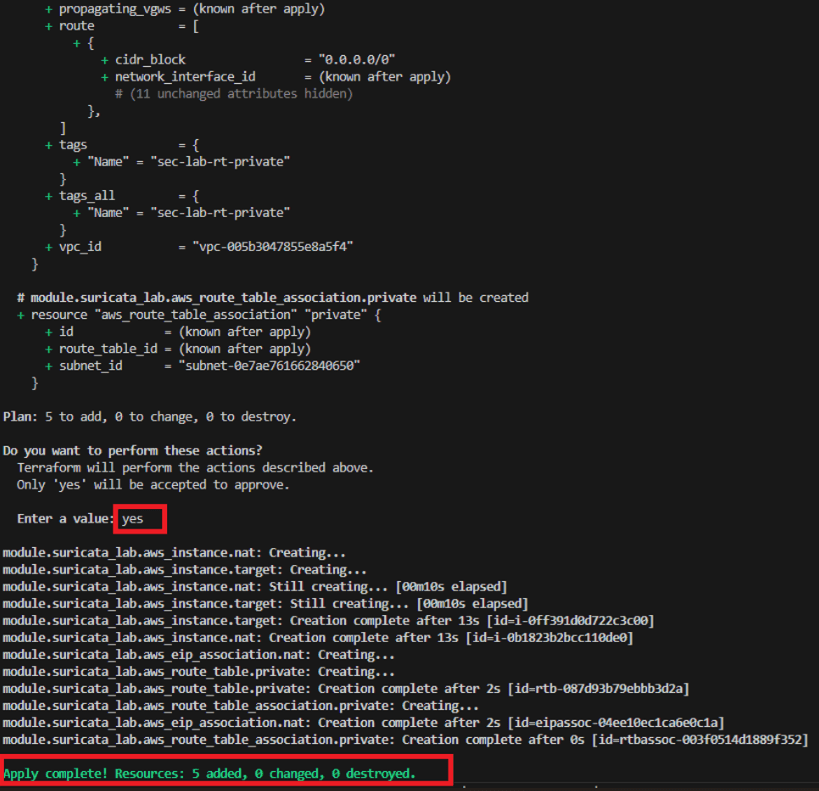

9. End State of Part 1
At this point:
- NAT Instance (Suricata + ELK location) is created
- EIP attached (fixed public IP)
- Private Subnet traffic is forcibly routed through NAT
- Target server is created
The next steps are clear.
Next Part
- Install Suricata + ELK on the NAT Instance
- Configure
ip_forwardandiptables (NFQUEUE) - Update rules and validate SIP signatures
Final Note
If Terraform is unfamiliar:
- Manually create VPC / Subnet / IGW / Route Tables / EC2 / EIP in the AWS Console
- Skip this part
- Proceed directly to Part 2
🛠 마지막 수정일: 2025.12.25
ⓒ 2026 엉뚱한 녀석의 블로그 [quirky guy's Blog]. All rights reserved. Unauthorized copying or redistribution of the text and images is prohibited. When sharing, please include the original source link.
💡 도움이 필요하신가요?
Zabbix, Kubernetes, 그리고 다양한 오픈소스 인프라 환경에 대한 구축, 운영, 최적화, 장애 분석,
광고 및 협업 제안이 필요하다면 언제든 편하게 연락 주세요.
📧 Contact: jikimy75@gmail.com
💼 Service: 구축 대행 | 성능 튜닝 | 장애 분석 컨설팅
📖 E-BooK [PDF] 전자책 (Gumroad):
Zabbix 엔터프라이즈 최적화 핸드북
블로그에서 다룬 Zabbix 관련 글들을 기반으로 실무 중심의 지침서로 재구성했습니다.
운영 환경에서 바로 적용할 수 있는 최적화·트러블슈팅 노하우까지 모두 포함되어 있습니다.
💡 Need Professional Support?
If you need deployment, optimization, or troubleshooting support for Zabbix, Kubernetes,
or any other open-source infrastructure in your production environment, or if you are interested in
sponsorships, ads, or technical collaboration, feel free to contact me anytime.
📧 Email: jikimy75@gmail.com
💼 Services: Deployment Support | Performance Tuning | Incident Analysis Consulting
📖 PDF eBook (Gumroad):
Zabbix Enterprise Optimization Handbook
A single, production-ready PDF that compiles my in-depth Zabbix and Kubernetes monitoring guides.
답글 남기기
댓글을 달기 위해서는 로그인해야합니다.